
{
"definition": {
"$schema": "https://schema.management.azure.com/providers/Microsoft.Logic/schemas/2016-06-01/workflowdefinition.json#",
"actions": {
"Alert_-_Get_IPs": {
"inputs": {
"body": "@triggerBody()?['Entities']",
"host": {
"connection": {
"name": "@parameters('$connections')['azuresentinel']['connectionId']"
}
},
"method": "post",
"path": "/entities/ip"
},
"runAfter": {
"Alert_-_Get_hosts": [
"Succeeded"
]
},
"type": "ApiConnection"
},
"Alert_-_Get_URLs": {
"inputs": {
"body": "@triggerBody()?['Entities']",
"host": {
"connection": {
"name": "@parameters('$connections')['azuresentinel']['connectionId']"
}
},
"method": "post",
"path": "/entities/url"
},
"runAfter": {
"Alert_-_Get_IPs": [
"Succeeded"
]
},
"type": "ApiConnection"
},
"Alert_-_Get_accounts": {
"inputs": {
"body": "@triggerBody()?['Entities']",
"host": {
"connection": {
"name": "@parameters('$connections')['azuresentinel']['connectionId']"
}
},
"method": "post",
"path": "/entities/account"
},
"runAfter": {
"Alert_-_Get_incident": [
"Succeeded"
]
},
"type": "ApiConnection"
},
"Alert_-_Get_hosts": {
"inputs": {
"body": "@triggerBody()?['Entities']",
"host": {
"connection": {
"name": "@parameters('$connections')['azuresentinel']['connectionId']"
}
},
"method": "post",
"path": "/entities/host"
},
"runAfter": {
"Alert_-_Get_accounts": [
"Succeeded"
]
},
"type": "ApiConnection"
},
"Alert_-_Get_incident": {
"inputs": {
"host": {
"connection": {
"name": "@parameters('$connections')['azuresentinel']['connectionId']"
}
},
"method": "get",
"path": "/Cases/@{encodeURIComponent(triggerBody()?['SystemAlertId'])}/@{encodeURIComponent(triggerBody()?['WorkspaceSubscriptionId'])}/@{encodeURIComponent(triggerBody()?['WorkspaceId'])}/@{encodeURIComponent(triggerBody()?['WorkspaceResourceGroup'])}"
},
"runAfter": {},
"type": "ApiConnection"
},
"For_each": {
"actions": {
"For_each_2": {
"actions": {
"For_each_3": {
"actions": {
"For_each_4": {
"actions": {
"Send_an_email_(V2)": {
"inputs": {
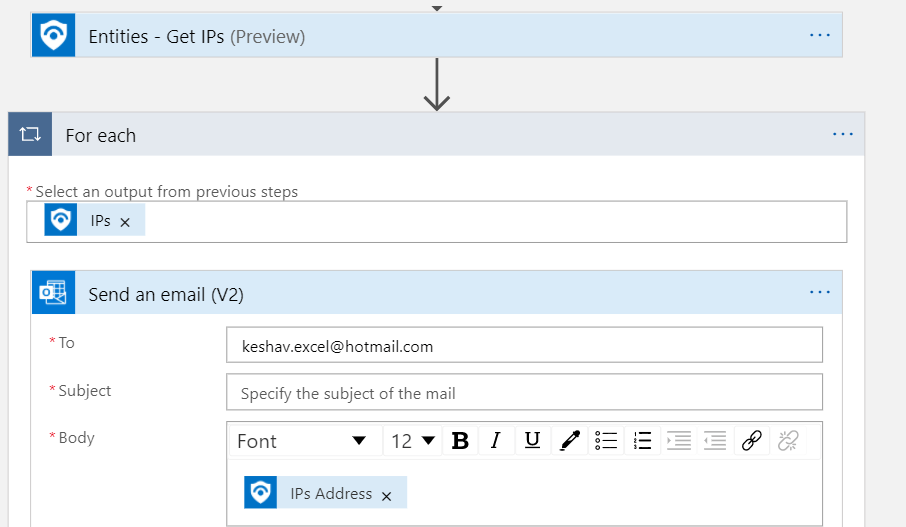
"body": {
"Body": "<p><strong>Please verify why you have deployed a public IP . <br>\n<br>\access.<br>\n</strong><br>\n<br>\nPublic IP @{items('For_each_3')?['Address']} is created.<br>\n<br>\nName of the IP Address @{items('For_each_4')?['Name']}<br>\n<br>\nThis User @{items('For_each')?['Url']} created the public IP.<br>\n<br>\nOther Deteails about this resource :- <br>\n<br>\n@{body('Alert_-_Get_hosts')?['Hosts']}<br>\n<br>\n<br>\nThis email is generated using the logic App. <br>\n</p>",
"Cc": "abc@xyz.com ",
"Subject": "Azure Sentinel Alert for Public IP. ",
"To": "@{items('For_each')?['Url']}"
},
"host": {
"connection": {
"name": "@parameters('$connections')['office365']['connectionId']"
}
},
"method": "post",
"path": "/v2/Mail"
},
"runAfter": {},
"type": "ApiConnection"
}
},
"foreach": "@body('Alert_-_Get_accounts')?['Accounts']",
"runAfter": {},
"type": "Foreach"
}
},
"foreach": "@body('Alert_-_Get_IPs')?['IPs']",
"runAfter": {},
"type": "Foreach"
}
},
"foreach": "@body('Alert_-_Get_hosts')?['Hosts']",
"runAfter": {},
"type": "Foreach"
}
},
"foreach": "@body('Alert_-_Get_URLs')?['Urls']",
"runAfter": {
"Alert_-_Get_URLs": [
"Succeeded"
]
},
"type": "Foreach"
}
},
"contentVersion": "1.0.0.0",
"outputs": {},
"parameters": {
"$connections": {
"defaultValue": {},
"type": "Object"
}
},
"triggers": {
"When_a_response_to_an_Azure_Sentinel_alert_is_triggered": {
"inputs": {
"body": {
"callback_url": "@{listCallbackUrl()}"
},
"host": {
"connection": {
"name": "@parameters('$connections')['azuresentinel']['connectionId']"
}
},
"path": "/subscribe"
},
"type": "ApiConnectionWebhook"
}
}
},
"parameters": {
"$connections": {
"value": {
"azuresentinel": {
"connectionId": "/subscriptions/<>/resourceGroups/<>/providers/Microsoft.Web/connections/azuresentinel",
"connectionName": "azuresentinel",
"id": "/subscriptions/<>/providers/Microsoft.Web/locations/<>/managedApis/azuresentinel"
},
"office365": {
"connectionId": "/subscriptions/<>/resourceGroups/<>/providers/Microsoft.Web/connections/office365-6",
"connectionName": "office365-6",
"id": "/subscriptions/<>/providers/Microsoft.Web/locations/<>/managedApis/office365"
}
}
}
}
}Category: Uncategorized
KQL Query in Sentinel to generate report of Users and details the Authentication Methods they have used.
SigninLogs
| extend authenticationMethod_ = tostring(parse_json(AuthenticationDetails)[0].authenticationMethod)
| extend authenticationMethodDetail_ = tostring(parse_json(AuthenticationDetails)[0].authenticationMethodDetail)
| extend authenticationStepResultDetail_ = tostring(parse_json(AuthenticationDetails)[0].authenticationStepResultDetail)
| extend authenticationStepRequirement_ = tostring(parse_json(AuthenticationDetails)[0].authenticationStepRequirement)
| extend authenticationStepDateTime_ = tostring(parse_json(AuthenticationDetails)[0].authenticationStepDateTime)
| where isnotempty(authenticationMethod_)
| project UserDisplayName, UserPrincipalName, AppDisplayName, authenticationMethod_, authenticationMethodDetail_, authenticationStepRequirement_, authenticationStepDateTime_, Status
| sort by authenticationStepDateTime_ desc
Azure Sentinel Defender Connectors Explained.
I have been working on the Sentinel for quite a long. Off late I got a task to explore the Defender Connectors. When I looked first into the connectors and checked for it, I found many defender connectors.

There seems to be individual connector for Endpoint, Identity and Office 365. Also there is one more connector called “Microsoft 365 Defender (Preview)” when I went inside this connector I saw that this connector will bring the telemetry for “Microsoft Defender for Endpoints” “Microsoft Defender for Office 365”, “Microsoft Defender for Identity”, “Microsoft Cloud App Security” .


So, I was bit confused. If Microsoft 365 Defender(Preview) can bring the data for everything then why we have so many other connectors like Defender for Endpoint, Defender for Identity, Defender for Office 365.
Later I found the answer by approaching Microsoft.
The Microsoft 365 Defender collector is going to raw logs from the four security platforms. Additionally, this connector is bi-directional meaning it closes the alert/incident at both sides. This connector can data for the datatypes:

But, the individual connectors for each security platform (Defender for Endpoint, Defender for Identity, Defender for Office 365), collect Alerts only. If you only wants alerts to be forwarded to sentinel then use these individual connectors.
| Microsoft Defender for Endpoint | SecurityAlert | where ProviderName == “MDATP“ |
| Microsoft Defender for Identity (Preview) | SecurityAlert | where ProductName == “Azure Advanced Threat Protection” |
| Microsoft Defender for Office 365 (Preview) | SecurityAlert | where ProviderName == “OATP“ |
Unable to cast object of type ‘System.String’ to type ‘System.Object[]’.
Environment: Azure Automation.
Runbook Type: PowerShell.
Mostly this problem arises in Azure Automation Runbook, if you are passing Array Parameters to an Azure Automation Runbook. So, in my case I was trying to accept the input parameters. Multiple server name.

Lesson learnt while installing the SysTrack 9.0
Just out of curiosity I thought on installing the Lakeside SysTrack 9.0 on Azure Virtual Machine. Here are few things I learnt.
- You can’t install Lakeside SysTrack 9.0 on Domain Controller.
- While installation I was facing some issues related to “SysTrack Database Prep Service” . It was failing to access database. Although I passed all the validation. I was getting this error because IPV6 was enabled. So, I disabled the IPv6 and rebooted the server. And installed the SysTrack 9.0.
- Logs for the installation can be found under the folder :- C:\Logs .
Configuring the Domain Controller on the Azure VM and then putting another VM in domain.
Configuring the Domain Controller on the Azure VM and then putting another VM in domain.
While working as part of the monitoring team I have to test multiple scenarios. Often, I get a need of the Domain Controller and a machines part of the domain. Mostly it comes up when I want to test the application that can only be installed on the machines which are part of the domains. For example, I want to test the monitoring for Citrix Environment. Here I have to configure the Citrix Environment which can only be done on machines which are part of the domain. This installation needs lot of service accounts as well.
Mostly for these kinds of research and proof of concepts I prefer doing things on the Azure VMs that are part of my dev\test subscription. I spin of the VM, test the things and delete the VM.
Once I thought of installing the domain controller on Azure VM’s so I did research on it and came across lot of articles. Most of these article are too much technical and suggest high level of customization. These kinds of article are mostly for creating the production environment. Mostly I use this configuration for doing a testing and POC’s.
However, for me requirement is a temporary DC where I can do the testing and delete the VM when my testing is over. So, here I will talk about a very easy way of creating the domain controller on Azure and adding a machine in that domain. I suggest you to not use this configuration for production environment.
Here are the steps to configure the Domain Controller and a machine in Azure.
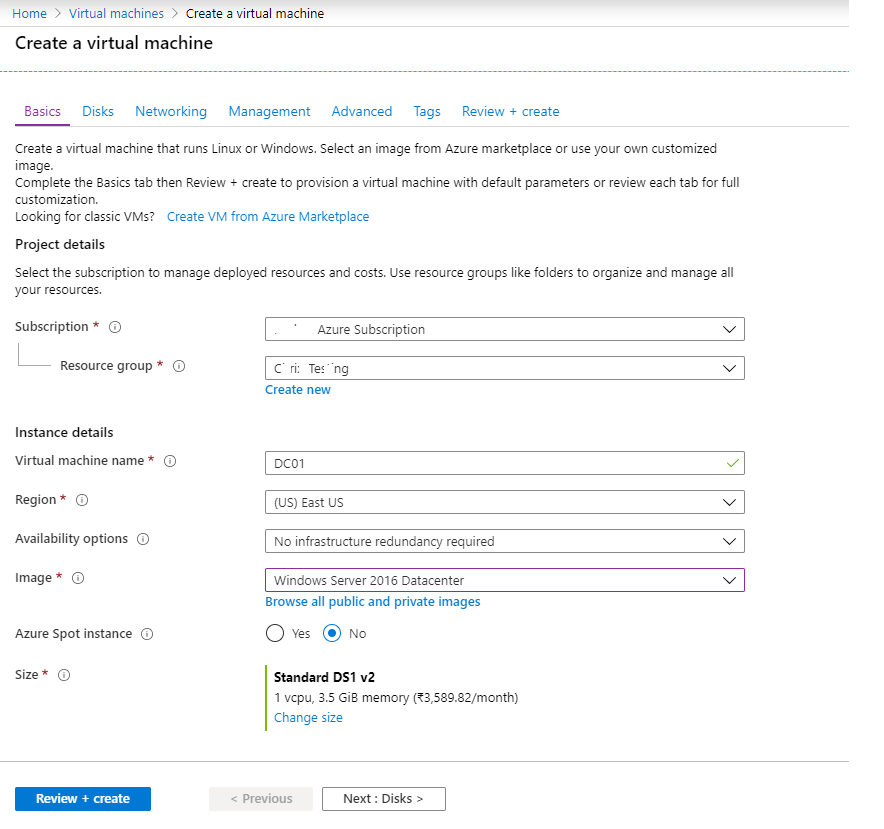
Creating the Virtual Machines
- Create two Windows 2016 VM’s in Azure. I prefer using the low cost vm’s like “Standard DS1 v2 (1 vcpus, 3.5 GiB memory)”. Make sure both the agent uses the same “Virtual network/subnet”.
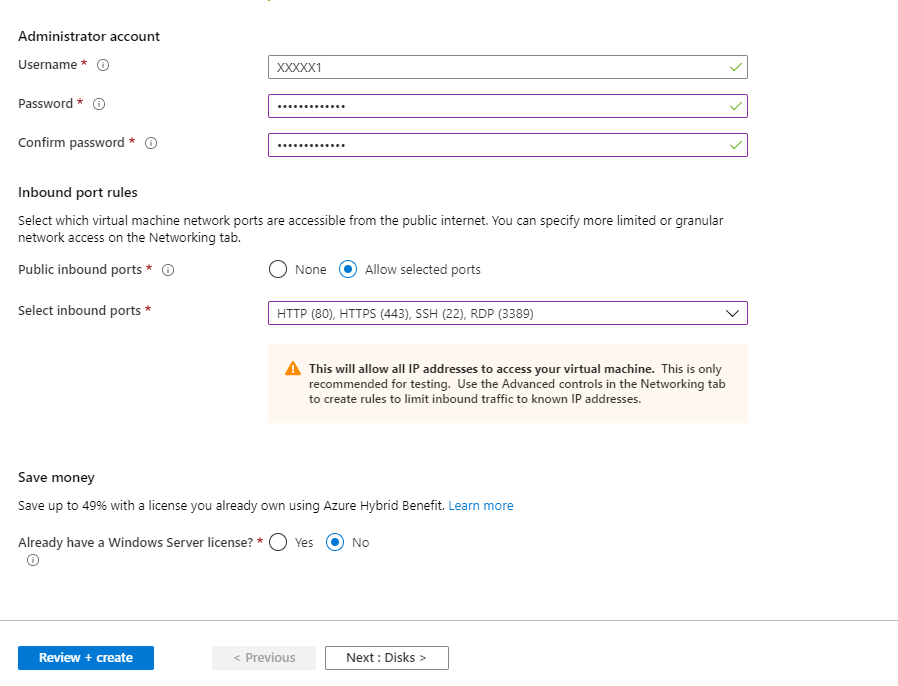
Define the Basic details
Define the Disks Details

Define Network Details ***Important Section***

Define the Management details

- Use all the default options under Advanced and Tags. Review the details. Click on Create.
While creating other VM follow the same steps. Make sure you are selecting correct size, Network options and marking this VM to shutdown during Off hours.
Installing the ADDS, DNS ad DHCP roles.
- Login to first VM and go the server manager and add the roles: –
- Active Directory Domain Services
- DNS
- DHCP

And simply do next and next. Ignore the warning specific to “Static IP Addresses”. We will fix these errors at the end. Just proceed with Default options. Do not make any changes to NIC from inside the VM. Ignore the below validation warning.

- After creating the domain controller, create the users and groups.
Configuring the DNS from Azure Portal.
- Installation of these components will reboot the server.
- Login again to server and right down the IP address of the DNS server. To do this go to server manager.

- Now come back to Azure Portal. Go the Virtual Machine.
- Click on the “Virtual network/subnet”. This will take you the Virtual Network which we created while creating the VM.

- Under the Virtual Network, search for DNS.
Under DNS, Select Custom and put the IP address which we copied from the Server DNS.

Now put second VM in the domain.
- Now Login to second VM. Open the Server Manager. Under Domain click on it and put this VM in the Domain. It will ask for Global Admin user name and password.
With these steps, you can have a domain controller and the machine part of this domain. Remember these are the steps for doing the testing. Please don’t follow these if you are planning the Production Environment.
Building the Resiliency in the Infrastructure with Azure Automation PowerShell Runbooks
Here is the copy of my session on “Building the Resiliency in the Infrastructure withAzure Automation PowerShell Runbooks” at Expert Live India 2020 Hyderabad.
https://1drv.ms/u/s!AtaahoqRQxFCh8RoZaZg4GCAsQjPnA?e=HZ0zCK https://1drv.ms/u/s!AtaahoqRQxFCh8RoZaZg4GCAsQjPnA?e=HZ0zCK
[Azure Log Analytics\Azure Monitor] Extracting the values from $webhookdata.
While configuring the alerts and action groups, $webhoodata is used to provide input to the Azure Automation based runbooks.
More precisely it is used when you want to azure automation runbook through Log analytics alerts. While creating alerts you have to define the action group. And this action group is responsible for calling the Runbook.
To receive data from the client, the runbook can accept a single parameter called $WebhookData. This parameter is of a type [object] that contains data that the client includes in the POST request.
The values for the $webhookdata are in JSON format and you can use the following properties to fetch the values from the $webhookdata.
$Webhookbody = $webhookdata | ConvertFrom-Json
$reqbody= $Webhookbody
$alertName = $reqbody.data.AlertRuleName
$Linktosearchresult = $reqbody.data.LinkToSearchResults
$Alert_Description = $reqbody.data.Description
$Search_Query = $reqbody.data.SearchQuery
$alertbody.data.essentials.alertId
$alertbody.data.essentials.alertRule
$alertbody.data.essentials.alertTargetIDs
$alertbody.data.essentials.description
$alertbody.data.alertContext.WorkspaceId
SCOM 2019 Report Deployment is failing.
Environment :- SCOM 2019, SQL 2017, SSRS 2017.
SCOM 2019 report deployment is failing with the errors:-
Failed to deploy reporting component to the SQL Server Reporting Services server. The operation will be retried.
Exception ‘DeploymentException’: Failed to deploy reports for management pack with version dependent id ‘684a5817-ab9a-19a8-2fc5-7a0088bfe831’. Failed to deploy linked report ‘Microsoft.SystemCenter.WebApplicationSolutions.Reporting.WebTestPerformanceReport’. The item ‘/Microsoft.SystemCenter.DataWarehouse.Report.Library/Microsoft.SystemCenter.DataWarehouse.Report.Performance’ cannot be found. —> Microsoft.ReportingServices.Diagnostics.Utilities.ItemNotFoundException: The item ‘/Microsoft.SystemCenter.DataWarehouse.Report.Library/Microsoft.SystemCenter.DataWarehouse.Report.Performance’ cannot be found.
Failed to deploy reporting component to the SQL Server Reporting Services server. The operation will be retried.
Exception ‘DeploymentException’: Failed to deploy reports for management pack with version dependent id ‘b0d3479b-d13a-3b71-3fa5-f7fcafd82d7d’. Failed to deploy report ‘Microsoft.SystemCenter.DataWarehouse.Report.MostCommonEvents’. Thread was being aborted.
Failed to deploy reporting component to the SQL Server Reporting Services server. The operation will be retried.
Exception ‘DeploymentException’: Failed to deploy reports for management pack with version dependent id ‘684a5817-ab9a-19a8-2fc5-7a0088bfe831’. Failed to deploy linked report ‘Microsoft.SystemCenter.WebApplicationSolutions.Reporting.WebTestPerformanceReport’. The item ‘/Microsoft.SystemCenter.DataWarehouse.Report.Library/Microsoft.SystemCenter.DataWarehouse.Report.Performance’ cannot be found. —> Microsoft.ReportingServices.Diagnostics.Utilities.ItemNotFoundException: The item ‘/Microsoft.SystemCenter.DataWarehouse.Report.Library/Microsoft.SystemCenter.DataWarehouse.Report.Performance’ cannot be found.
Failed to deploy reporting component to the SQL Server Reporting Services server. The operation will be retried.
Exception ‘DeploymentException’: Failed to deploy reports for management pack with version dependent id ’62c5d977-1af6-c027-853e-9f03333ffd63′. Uploading or saving files with .PerformanceBySystem extension is not allowed. Contact your administrator if you have any questions. —> Microsoft.ReportingServices.Diagnostics.Utilities.ResourceFileFormatNotAllowedException: Uploading or saving files with .PerformanceBySystem extension is not allowed. Contact your administrator if you have any questions.
Resolution :-
This is because of a security restriction in later builds of SSRS 2017. The fix is to open SQL Management Studio, connect to your Reporting Services instance, open the Properties of the instance, Advanced, and add . to the list for “AllowedResourceExtensionsForUpload” .
